Pages

WELCOME

This blog was created to act as a record of the cards and other projects that I have made. It is for both my own reference and to help inspire anyone who wants to take a look.

I'd love it if you'd leave me a comment so that I know what you think of my projects and that you've been to visit!

Anyone can comment, even those who don't have a blog. (Just look for the word 'Comments' under the three little pictures at the end of each post). Readers without a blog can add an anonymous comment, but please leave your name (and docrafts username if applicable) so I know who you are!

Slideshows of all the cards I've uploaded to my blog can be found at the bottom of the page.


PEOPLE WHO FOLLOW MY BLOG

Thursday 30 September 2010

Lilac, Blue and Green Flower Power Tilda

This lovely little lady was very kindly donated to me by Tara back in 2008 in a swap we did. She really is a cutie, isn't she!!


I decided to watercolour the Flower Power Tilda image using the Whispers Brushstroke markers and cut the image out.

A panel of the circle paper from the Basic Grey Lily Kate paper pad was matted onto blue paper, and a panel of adhesive plasterer's scrim was attached to the front of the patterned paper. I found this particular one in Wickes and it seems to be sticky enough to stay stuck to the paper.

Two lengths of lilac organza ribbon were attached across the panel and three large clear faux gems were attached onto the ribbon.

The circle sentiment panel, from Aud Designs, was stamped using Versafine Onyx Black archival pigment ink and watercoloured using the Whispers markers. This was matted onto a circle of the patterned paper and a scalloped circle of the blue paper, all cut out using Nestabilities dies.

A small clear gem was added to the centre of the flower on the sentiment panel.

Here are the challenges that I'll be entering this card into:

Monday 27 September 2010

Pink and Black Blythe Moments

This is the card that I made for my sister's birthday. She's a bit of an artist so thought she'd appreciate this quirky image. A bit of change from the Tilda card I sent her last year!!

The Blythe image, from Stampington and Co, was stamped using Memento Tuxedo Black dye ink and coloured using Copic sketch markers:
  • Hat: RV06, RV21, RV34, N3
  • Dress/Butterfly: R39, RV06, RV21, RV34, N1, N3
  • Skin: E00, E21, E51, R20
  • Shoes: N3
The corners were rounded using the XCut large corner rounder punch and the edges distressed using Tim Holtz Black Soot distress ink. This was then matted onto a pink panel die cut using the Mega Curved Rectangles Nestabilities die.

A panel of the pink and black passionflower paper from the Papermania Classical Handmade paper pack was matted onto the pink and black cardstocks. A strip of the pink card was embossed using the Swiss Dots-like border embossing folder from the Cuttlebug Just My Type border set. A line was embossed either side of the dots and distressed wit hthe Black Soot ink. The strip was then matted onto black card and across the handmade paper panel.

The sentiment, from the Hero Arts Anytime Messages stamp set was stamped using Versafine Onyx Black archival pigment ink and distressed using the Black Soot ink, as was the embossed pink panel.

The image panel was matted over the embossed strip and the sentiment added below it.

The image panel was highlighted with Glitz It Light Purple glitter glue, and Papermania silver self-adhesive gems were added to the flowers and the sentiment panel.
 
 
The inside of the card was also decorated using the pink and black card and a strip of the passionflower paper. The sentiment was stamped using stamps from the Elzybells Swirly Sentiments stamp set and the Onyx Black ink, with the edges of the sentiment panel distressed with the Black Soot ink.

Here are the challenges I'm entering this card into:

I Made Top 3 At Stamptacular

My Blue and Green Time and Tide Collage card has made Top 3 at the Stamptacular Challenge.


It made Top 3 in their Grid Challenge.


You can see my original post for this card here.

Sunday 26 September 2010

I Made The Top 3 At The Keep It Simple Challenge

My Brown and Cream Owls and Swirls card has made Top 3 at the Keep It Simple Challenge.


It made Top 3 in their Swirls Challenge.


You can see my original post for this card here.

Saturday 25 September 2010

Teal, Pink and Turquoise Bumble Bee Gorjuss Girl

This is one of my favourite Gorjuss Girl images. This image was stamped at Julie's house last August using one of Julie's stamps! I really can't believe how long ago that was now - over 13 months!!!


The Bumble Bee Gorjuss Girl image was stamped using Versafine Onyx Black archival pigment ink, coloured using Copic sketch markers:
  • Hair: N1, N3, N5
  • Skin: E00, E21, E51, R20
  • Socks/Hearts: R20, YR02
  • Dress: BG13, B45
  • Wings: BG11, BG13

and cut out.

A panel of white card was cut out and stamped using one of the flourish stamps from the Autumn Leaves  v1 Flourish Rhonna Farrer stamp set and ColorBox Celadon pigment ink. This was then matted onto a panel of blue Core'dinations card die cut using a Labels 1 Nestabilities die.

A panel of the Spumoni paper from the much underused Basic Grey Two Scoops paper pad was cut and the corners punched using the Martha Stewart Double Loops corner punch.

A strip of the Ice-Cream Parlour paper, from the same paper pad, was adhered across the centre of the punched panel and matted on to the card blank.

The Gorjuss Girl image was placed over the white stamped panel and the 'Happy Birthday' words, from the Woodware Jane's Script sentiments stamp set were stamped either side of the image using the Versafine Smokey Gray archival pigment ink and traced over using the Sakura clear Stardust pen.

Holes were punched in two corners of the Label shape using the Big Bite and small teal Papermania eyelets were set in the holes and light blue satin ribbon was knotted through them.

The Gorjuss Girls image was then added to the centre of the panel using 3D foam pads and Craft Planet Iridescent Sparkle glitter glue was added over the wings, small heart and dress hearts of the image.

A white Papermania Imaginisce paper flower was layered over an aqua Prima flower and a small teal Papermania eyelet was added to the centre. A length of the light blue ribbon was knotted and threaded through the centre as a finishing touch.

Wednesday 22 September 2010

Blue and Green Time and Tide Collage

Thought I should upload one of the many masculine cards I seem to have been making lately. This one is using the great Time Piece Collage stamp from the Paper Artsy Clocks 3 stamp set. I'm hoping I'll get quite a bit of use from this stamp - it looks great in lots of different colours.


The Time Piece Collage image was stamped using Papermania Olive Green ink and heat embossed with Heat It Up! Verdigris embossing powder. The image was then die cut using a standard square Nestabilities die and distressed using Tim Holtz Antique Linen, Broken China and Frayed Burlap distress inks. This was then matted onto a square of blue card also distressed with the inks.

A panel of the Boulder paper from the Basic Grey Archaic paper pad was distressed around the edges using the same distress inks, as was the strip of the Bygone Plaid paper, from the same paper pad. The plaid paper was matted onto blue card and across the Boulder paper.

The sentiment, also from the Clocks 3 stamp set, was stamped in the lower corner of the patterned paper using the Broken China distress ink.

The image panel was added over the plaid paper and two aqua card candy from Craftwork Cards, colour distressed with the Broken China and Frayed Burlap inks, were added in diagonal corners.

I will be entering this card into a few blog challenges:

This week's Tuesday Taggers Challenge is sponsored by Ribbon Oasis


Monday 20 September 2010

Red, Orange and Yellow Fetch Dog

Here are a couple of cards I made for a couple of young boys. I love this image from Little Claire's that I bought at the Lincoln Sincerely Yours show in May.


The Fetch Dog image, from Little Claire, was stamped using Versafine Onyx Black archival pigment ink and coloured using the Copic Sketch markers:

  • Puppy: E13, E35, E43, E57

  • Stick: E35, E57, N5

  • Shadow: E43, N1 
This was matted onto a panel of red card and a panel cut from orange card using the Labels 8 Nestabilities die .

A strip of the orange spot paper, from the K&Co Hopscotch Boy paper pad, was matted onto the red and orange card and across a panel of the red and yellow chequers paper from the same paper pad which was in turn matted onto the red and orange card.

The much under-used oval stamp die cut, from Cuttlebug, was cut from white and orange card and the sentiment was stamped using the Onyx Black ink in the centre of the white panel.

The puppy's nose was then highlighted with Anita's 3D Gloss.

I made a second version of this card, just moving the placement of the two panels with the sentiment panel directly below the image panel.


I will be entering this card into the following blog challenges:
ETA: This card is now in the Little Claire's Gallery for this stamp and for the set of this stamp and the Woof stamp.
You can see them here and here. (For some reason they've put the individual images in the wrong gallery!!)

Saturday 18 September 2010

Hot Pink and Lime Shopping Miss Anya

Here is a birthday card I made for a young lady who is about to embark on her university studies in Dublin.


The Shopping Miss Anya image, from The Greeting Farm, was stamped using Memento Tuxedo Black dye ink and coloured using Copic Sketch markers:
  • Hair: YR02, E35, E39
  • Skin: E00, E21, E51, R20, YG11, Y00
  • Bow: R29, RV21, RV34
  • Top: RV21, RV34, R29, G14, E43, Y08
  • Shorts: G14, E43, YG11, Y08
  • Socks: RV21, G14, E43, YG11, Y08
  • Bags: 1) RV21, RV34, C0; 2) G14, E43; 3) RV21, RV34
  • Shadow: N1, N3, E11, 0
 and matted onto pink paper.

The hair on the image was coloured following the excellent tutorial on the Colour Me Copic blog showing how to colour curly hair using Copic markers, so many thanks to them for that.

A panel was die cut using the Labels 8 Nestabilities die and the centre masked. Small images from the See D's Vintage, Romantic and Whimsical Garden Morsels stamp sets (which really haven't been used as much as I thought they would be when I bought them) were stamped around the edge using ColorBox Olive Pastel Fluid Chalk ink.

This was then overstamped with the 'Happy Birthday' stamp from the Woodware Jane's Script Sentiments stamp set using Versafine Spanish Moss archival pigment ink and traced over the top with a clear Sakura Stardust pen.

A panel of the pink butterfly paper from the Papermania Summer Bloom paper pad was matted onto the pink and green paper with the image added off-centre.

Anita's 3D Gloss was then added over the hair bow and the shopping bags, and a wash of clear Sakura gel pen was added to the eyes.

A pink silk flower from Papermania was added in the top left corner with a clear embossed pink card candy, from Craftwork Cards, added in the centre.

To heat emboss the card candy, I found the easiest way to do it is to add a small piece of double sided tape to the end of a pencil (preferably not painted) and press the card candy onto it. Tap the card candy into the inkpad you wish to use until the candy is covered in the ink than dip the candy into the embossing powder.

Tap off the excess embossing powder and heat, turning the pencil as the embossing powder starts to melt. Once the embossing powder has all melted, leave to cool for a few seconds then remove from the pencil - the heat will have softened the tape a little, making it easy to peel away. You can then re-use the tape if you need to do multiple card candy.

There are a few challenges that I'd like to enter this card into:

Thursday 16 September 2010

Pink, Black and Silver Butterfly Frame

Here is a card I made as an anniversary card using the free Kate Knight papers that came with a recent copy of Cardmaking and Papercraft Magazine.


The Butterfly image, from the Penny Black Enjoy Life stamp set, was stamped using Versacolor Black pigment ink and heat embossed with PSX silver embossing powder. The image was then coloured using Craft Planet Fuchsia glitter glue and Tim Holtz Rock Candy Distress Stickles and die cut using a standard circle Nestabilities die.

The Fleur de Lys circle frame stamp from the Papermania Hampstead Icons and Sentiments stamp set was stamped using the Versacolor Black ink and silver embossed and die cut into a circle. A further circle was die cut from black card and a big scalloped circle from silver mirror card.

A strip of the black card was punched using the Martha Stewart Garden Trellis deep-edge punch and layered onto the silver mirror card. This was then matted onto a square of the pink and black floral paper from the Kate Knight paper pack.

The edges of this paper were distressed with the Tim Holtz Black Soot distress ink and matted onto the black card.

A couple of Prima paper flowers were layered up with a white Papermania flower brad and added in the top right hand corner. The brad was covered with the Rock Candy Stickles and black glitter from the Lakeland glitter pack was sprinkled over the top.

I will be entering this card into a few challenges:

Tuesday 14 September 2010

Pink, Yellow and Green HOTP Anniversary

This card was based on one of the designs shown in the HOTP Ultimate Floral Cardmaker's Creative Pack. For that reason, I won't be entering it into any challenges, but will post it 'for fun'.

This is the card that I made for my dad and his wife for their wedding anniversary.


Firstly, the front of the card blank was covered using panels of green and yellow papers from the HOTP Ultimate Floral Cardmaker's Creative Pack. A swirl, from the HOTP Christmas Swirls stamp set, was stamped at the bottom of the yellow panel using Versafine Onyx Black archival pigment ink.

The 'Happy Anniversary' stamp from Stamps Away was stamped onto a strip of pink paper also from the Ultimate Floral paper pack and adhered onto a strip of the green polka dot paper.

A length of pink picot-edge ribbon from the Chatterbox Rosey ribbon pack was attached along a length of the pink paper and attached along the card front with a knot of the pink ribbon adhered on to it.

Three circles were cut from scrap card using Nestabilities and covered with the yellow weave patterned paper. Rub-ons from the HOTP Words, Hearts and Flowers rub-on sheet were added to the circles and attached to the left of the panel.

I also decorated the inside of the card, using small pieces of the matching papers from the front of the card. The green polka dot paper was stamped using the dot border stamp from the HOTP Stitches stamp set and one of the swirls from the HOTP Christmas Swirls stamp set.


The 'Warm Wishes' stamp, from the HOTP Sentiments stamp set, was stamped and the dot border stamped below it using the Onyx Black ink, and cut out and matted onto the patterned paper.

A small loop of the pink ribbon was attached behind the yellow panel of paper before attached to the card.

Monday 13 September 2010

Brown and Cream Owl and Swirls

Here is the card that I made for my hubby's aunt for her birthday. I don't often use glitter because of the mess I always end up making, but I decided to try it out on this card. The effect was quite good, but doesn't really show up in this picture.


The swirl stamp, from the Autumn Leaves Rhonna Farrer Flourishes v1 stamp set, was stamped onto white card using Versafine Vintage Sepia archival pigment ink, and the owl image, from the Papermania Secret Garden stamp set, was stamped to appear sitting on the swirl, also using the Vintage Sepia ink.

Extra swirls were added to the left of the panel and the swirls and owl were coloured with Copic sketch markers:

  • Branches/Owl: E13, E31, E35, E39
 The corners of the panel were then rounded using the large XCut corner rounder punch.

The sentiment, from the Elzybells Swirly Greetings stamp set, was stamped in the top right corner with the Vintage Sepia ink and the edges of the panel were then distressed with Tim Holtz Antique Linen distress ink.

The swirls were then glittered using Crystal DecoArt Glamour Dust, and the owl was glazed using Anita's 3D Gloss.

The owl panel was then matted onto a panel of brown card die cut using the Labels 8 die from Nestabilities.

A strip of the brown and cream swirl paper from the Papermania Botanical Handmade paper pack was matted onto a strip of the brown card which in turn was matted onto a panel of the Brittle paper from the Basic Grey Bittersweet paper pad.

The owl panel was then matted over the swirl strip and three cream card candy from Craftwork Cards were coloured with the Antique Linen distress ink and added in the bottom right hand corner.

I'll be entering this card into a few challenges:
*****************************************************************

ETA: This card made Top 3 at the Keep It Simple Challenge.

*****************************************************************

I've Been Awarded The Cherry-On-Top Award!

I've been given an award by the lovely Linda. She has picked my blog as she considers it to have a variety of designs on it. Eclectic might be a better word - or maybe random!!!


Anyway, here's what I have to do:
  1. Thank the person who gave the award to me.

  2. Put the award on my blog.
  3. List three things I like about myself.
  4. Post a picture I love.
  5. Pass the award on to 5 other people.
So, here goes!!!

Firstly, I'd like to thank Linda for thinking of me when deciding who to pass this award on to - I really appreciate it.

I have added the award to my blog above.

Now the hard bit - three things I LIKE about myself...........
  1. I have discovered a hobby that I like to participate in and have made some really good friends because of it. Just a shame I don't live just round the corner from any of them!!
  2. I'm learning to live with a series of recent diagnoses of Type 1 Diabetes, hypothyroidism and high cholesterol. This has meant a huge change to my life (especially the fact I can no longer eat carrot cake - can you imagine it!!) but I'm learning to just get on with it!!!
  3. I make a mean curry!! It's so good, I get requests for it - from squaddies no less - and we all know what a discerning palate they've got when it comes to curry!!!!
Here is a picture of me and hubby at last year's Christmas Ball. I like this photo as it's the first one of the two of us after my diagnosis of Type 1 Diabetes, and I actually think I look alright - I normally I hate any photo of me!!!

Now for the hard bit - I have to pick 5 blogs to pass this award onto. So, here they are:
Please take a look at their lovely blogs - they really are a great inspiration to me. It's just a shame I had to keep it to only 5 blogs!!!

Saturday 11 September 2010

Copper and Blue Medallion Anniversary

This is the card I made for my hubby last year for our anniversary. I wanted to use my set of Laurence Llewellyn-Bowen stamps and decided to use them in conjunction with my mica powders.


The medallion stamp from the Laurence Llewellyn-Bowen Venaissance stamp set was stamped onto brown card using ColorBox Topaz pigment ink and embossed using Heat It Up! copper embossing powder. The image was then coloured using Stamps Away mica powders. They don't really show up in the picture, but I also think that maybe I need to use more of them rather than being quite so stingy with them!!! The image was matted onto blue card and copper mirror card.

A strip of the brown card was matted onto the blue and copper card and three small copper eyelets were set (rather lopsidedly!!) in the strip of card. This was then matted across a panel of the blue flourish paper from the LLB Venaissance paper pad, which in turn was matted onto the copper mirror card and onto the card blank.
The sentiment, from Stamps Away, was stamped onto the brown card using the Topaz ink and copper embossed. This was cut out in a label shape using the HOTP Labels template and matted onto the blue and copper card.

I will be entering this card into a few blog challenges:

Friday 10 September 2010

I Made The Top 3 At Incy Wincy Designs Challenge


It made Top 3 in Challenge #56 which had a theme of Buttons & Bows.


You can see the original post for this card here.

Thursday 9 September 2010

Pink, Burgundy and Blue Little Birdie Gorjuss Girl

Here is a card I made for my great-aunt in Canada - hopefully she'll like this image!


The 'A Little Birdie Told Me' Gorjuss Girl image, from Sugar Nellie, was stamped using Memento Tuxedo Black dye ink and coloured using Copic markers:
  • Hair: E21, E31, E35, E57
  • Skin: E00, E21, E51, R20
  • Dress/Socks: R20, R39, C0
  • Bird: B02, C0
  • Shadow: N3, E31
The image was then die cut using the 'out of the box' technique and a standard square Nestabilities die.

A larger square was cut from candy pink textured card from Papermania and the edges were scuffed using the Basic Grey precision file set. A big scalloped square was then die cut from the dusky red textured card from Papermania, scuffed with the precision file set and coloured with the Tim Holtz Dusty Concord and Fired Brick distress inks.

A panel of the Felicity paper from the Basic Grey Euphoria paper pad was matted onto a similarly distressed mat of the dusky red textured card, as were two small panels of the Utopia paper from the same paper pad.

A Prima paper flower from the Botanical Mix tub was added to the image panel using a large pink Papermania brad, and two small pink Papermania brads were added to the two small panels of Utopia paper. The brads were then highlighted with small dots using the Papermania Snow White gel pen.


The sentiment, from the Papermania Clare Curd Sentiments stamp set, was stamped in the bottom corner of the card blank using Versafine Crimson Red archival pigment ink and traced over the top with a Sakura Clear Glaze pen, as was the red bow on the dress.

I will be entering this card into a few blog challenges:

Tuesday 7 September 2010

Pink and Brown Daisy Fan Tiles

This card was based on a project in the June 2010 issue of the Craft Stamper magazine.

It is created by making what is called a Serigraph. This consists of a colourful background made with a brayer and three or four co-ordinating colours.

This was something a little out of my comfort zone but I loved the look of the card in the magazine and wanted to give it a try!! I think it makes a nice anniversary card for the in-laws!


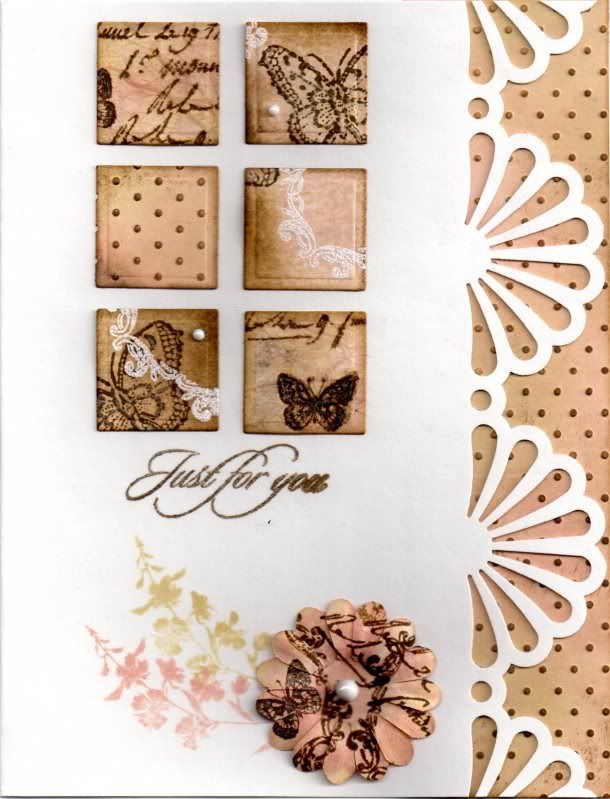
To create the serigraph background, a piece of cream card was coloured using the Tim Holtz Tattered Rose and Antique Linen distress inks. This was overstamped with the circle flourish frame image from the Papermania Chatsworth Frames stamp set using Emboss Clear ink and heat embossed with Stampendous Detail White Opaque embossing powder. The Tim Holtz Walnut Stain distress ink was then used to fill in areas of the card that weren't already coloured with the other two colours. The embossing was then wiped with a tissue to remove any excess ink.

Using the Walnut Stain ink, the two butterfly stamps from the Penny Black Enjoy Life stamp set and the Crafty Individuals Wildflowers stamp set were randomly stamped over the sheet. The butterflies were then highlighted with the Sakura clear Stardust pen.

A second sheet was created by colouring a piece of white mulberry paper with the Tattered Rose and Antique Linen inks, and then over stamped with the Hero Arts Old Writing stamp and the Crafty Individuals Butterfly stamps with the Walnut Stain ink.

A third sheet was created by colouring the cream card with the Tattered Rose and Antique Linen inks and then embossed with the Cuttlebug Swiss Dots embossing folder. The raised dots were then coloured with the Walnut Stain ink.

The mulberry paper was backed with cream card and small squares were cut from all three sheets using a standard square Nestabilities die.

The edge of a 5"x7" card blank was punched using the Martha Stewart Daisy Fan deep-edge punch and a panel of the embossed card was adhered to the inside of the card so it can be seen through the punched edge.

Six of the small tiles were adhered to the front of the card and a small white Papermania adhesive pearl was added to a couple of the tiles.

The 'Just For You' sentiment, from the HOTP Sentiments stamp set, was stamped below the tiles using the Walnut Stain ink and traced over with the Sakura clear Stardust pen.
 
Using the Tattered Rose and Antique Linen inks, the larkspur image from the Crafty Individuals Wildflower stamp set was stamped at the bottom of the card blank.
 
A cream Papermania Imaginisce paper flower was coloured with the same inks and overstamped with the small butterfly, flourish frame and Old Writing stamps using the Walnut Stain ink. A large white adhesive pearl was added in the centre of the paper flower and adhered to the card over the edge of the larkspur stamped images.

I would like to enter this card into a few challenges:

Sunday 5 September 2010

Mustard and Purple Bartender Edwin

Here's a card I made for my sister's fiancé - he's actually a Spanish waiter so thought this image was perfect for a card for him.


I picked the papers first, from the Papermania Persimmon paper pad, and coloured the image to match.

The Bartender Edwin image from Magnolia was stamped using Memento Tuxedo Black dye ink and coloured using Copic sketch markers:
  • Hair: E31, E35,E57
  • Skin: E00, E21, E51
  • Collar/ Tie/Cuffs/Belt/Shoes: Y08, E31, E35
  • Shirt: B18, B45, V17
  • Trousers: B18, B24, B45
  • Tray: C4, C6
  • Glasses: C0, C2
  • Cocktails: BV31 & B45; Y08 & E31; V17 & C2
  • Shadow: E31, C0, C2
The image was then cut out and the corners rounded using the large XCut corner rounder punch, and the edges of the image panel were distressed using Tim Holtz distress inks in Aged Mahogany and Dusty Concord. The image panel was then matted onto a panel of mustard coloured card die cut using the Mega Curved Rectangles die from Nestabilities.

Circles were die cut from white and mustard yellow card using standard circle Nestabilities dies and the sentiment, from the Papermania Clare Curd Sentiments stamp set, was stamped on the white circle using a combination of Wisteria and Warm Violet ColorBox Fluid Chalk inks. Asterisks, from the Fiskars Make A Wish Quotes stamp set, were also stamped using the same chalk inks.

The edge of the white circle was distressed using the Aged Mahogany and Dusty Concord inks and matted onto the mustard circle. A hole was punched in the circles and a small mauve Papermania eyelet set and a length of purple fibre was threaded through. This was then attached to the reverse of a panel of the mustard and purple flourish polka dot paper from the Papermania Persimmon paper pack. A second length was then attached to the left side of the panel to give the appearance of being wrapped all around the panel.

The patterned paper panel was then adhered to the centre of a square card blank and the image panel was adhered over the circles.

Three gold card candy from Craftwork Cards were coloured using the Tim Holtz Scattered Straw, Wild Honey and Walnut Stain distress inks and added in the bottom right hand corner.

Anita's 3D Gloss was then added to the glasses and the belt buckle, and DecoArt Crystal Glamour Dust was sprinkled into the gloss on the glasses.


I shall be entering this card into a few challenges this week:
Blog Widget by LinkWithin